1. What Is the Tool Used For
The tool analyzes your ads and recommends how to increase their CTR and Clicks. It is primarily valuable for beginners who are not familiar with the best practices in ads creation.
2. How It Works
Each active ad is analyzed for compliance with the best practices checklist. You should edit your ads according to the recommendations. The more points are not done, the more potential traffic growth you have.

Note! The tool does not consider the keyword variations while checking them in the title, path, and description. If you see the keyword in the ad while the checklist shows the opposite, ignore it. Later, we will add morphology recognition.
2. Short-List Of Key Features
- Checking your ads for compliance with the best practices checklist.
- Calculating the potential traffic growth after applying recommendations.
- The automated word capitalization.
- Changing your ads directly from the PromoNavi.
3. How to Check Your Ads
Choose the campaigns for which you want to get ad recommendations.

In the drop-down list, select the campaigns you want to analyze.

The list of ads is presented in a table. Editing the recommended ads will help you increase Google Ads campaign performance. The potential amount of clicks (per year) is displayed in the top right corner. That’s how many clicks you can get by improving your ads.

For every ad in the table, you can see the number of recommendations and potential clicks.
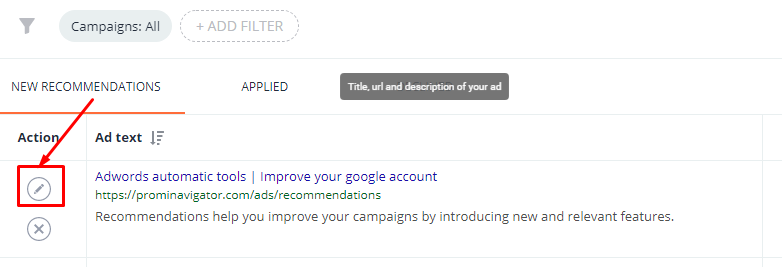
To display recommendations, click on the pencil icon.

In a drop-down window, you’ll find the ad text displayed (1) and the recommended changes you should make (2). The name of the ad group and keywords are displayed at the top of the window.

4. How to Edit Your Ads and Apply Changes
The best practices the tool checks are:
- The title includes keywords.
- The path includes keywords.
- For each ad, three headings are filled in.
- For each ad, two descriptions are filled in.
- The letters in the headlines are capitalized.
Let’s take an example. We see that all the recommendations have not been implemented.

The first recommendation is to add keywords to the title. We rewrite the titles to match this checklist point.

Similarly, we edit the path. Now, we’ve got two points checked. Let’s move further.

In the next steps, we fill in the third headline and the second description.

To capitalize the first letters in headlines automatically, we click the “Magic wand” icon.

After the changes are done, take a look at the recommendations list. All recommendations should be marked with a green checkmark. This means that everything is done correctly. Now, press the APPLY EDITS button to save changes.

Don’t want to follow the recommendation to change the ad text? Just click the “x” icon to decline the recommendation.

Besides the NEW RECOMMENDATIONS tab, there are two more tabs:
- APPLIED — the list of completed recommendations;
- DECLINED — the list of declined recommendations.

Keep in mind: You can always return recommendations on the DECLINED tab to the initial list whenever you’d like.
